I’m about to go on another epic riding adventure, and my free time has been consumed with preparation. Someone who came into the office yesterday commented that she had no idea it took so much to get ready for a big ride and it occurred to me that I’ve never really shared what goes into preparing for that moment when I get onto the bike and head off down the road. I’m going to try to fill you in on all the details without boring you to tears with minutia. Here goes…
For me, successful long riding depends on relative comfort. This means plenty of good, REAL food and proper clothing for the weather.
Raiding the Closet
Here in Southern California we our weather is generally temperate without much rain, but in the fall and winter anything is possible. I typically start checking the forecast about a week ahead to make sure there are no surprises. If it is going to be over 75 degrees and sunny, I’ll pack the sleeveless jersey. Cooler, and I’m going for short sleeves so I have the option of using arm warmers. Below 65, I typically want long sleeves and a wind breaker. Below 55, and I’m going for wool socks, leg warmers or tights, ear warmers, and probably a layer of fleece or wool. For a ride which will last more than 24 hours, I’ll plan to bring a change of shorts. Nobody wants to sit on a bike seat for 40 hours in the same shorts!
Safety Stuff
Next, there’s gear. Many of my rides keep me on the bike long after the sun goes down. There’s nothing worse than having your headlight die at 3:00am, with another 50 miles to go. Just like in climbing and back packing, redundancy is the rule. If one is good, two is better as long as you have the space to carry it. There’s always a delicate dance between having enough back-up gear and not having so much stuff hanging off the bike that you can’t make a turn without tipping over.
Many bike headlights are designed for commuters, so the batteries are good for a “generous” 4-6 hours. That’s great if you only need an hour or two on the way home, but not so good if you’re going to be out for two nights! There are lights designed to be powered by the turning of your wheels, and these require purchasing hubs and in some cases different wheels to accommodate the special equipment. The mechanisms put extra friction into the system, so you have to use more effort to pedal. I opted for the biggest battery-powered light I could find. It’s crazy bright and runs on rechargeable AA batteries which can be replaced if they run out of juice. The whole thing is a single LED with a bunch of mirrors, so it is super energy efficient and I’ve kept it going for two full nights on one set of batteries. I’ve also had it die in 6 hours when the batteries were not as fully charged as I thought they were, and was saved by my obsession with carrying at least one full set of fully charged batteries beyond what my electronics require. I have two little back-up headlights which will allow me to ride legally, but won’t really give me enough light to ride at my normal speed. Both of these have battery life of about 7 hours and need to be plugged in to recharge. Perhaps Santa will bring me a second “big” light someday J
Tail lights are also important, since most cyclists who get into trouble with motorists who “didn’t see” them are hit from behind. I have two tail lights on the bike, and one on my helmet. All three are turned on as soon as it gets dusky, and I carry back-up batteries for all of them. In addition, I have reflective tape on my cranks and spokes AND I wear reflective ankle bands and a reflective vest at night. You can’t be too visible!
My other safety gear includes a helmet, protective glasses, and a rear-view mirror which mounts on the bow of the glasses. The mirror looks a little dorky, but I have a neck which doesn’t always appreciate hours in a fixed position, and turning your torso to look over your shoulder to see if it is safe to make a left turn or change lanes is a great way to steer your bike into the traffic behind you and become an entry for a Darwin Award. I’m already coated in reflective gear while wearing lycra, so one more dorky accessory is a small price to pay to survive my ride.
Mrs. Fix-it
One of the challenges of Randonneuring is that you don’t typically have SAG (Support And Gear) support on the ride. This means you have to carry any tools you need to fix whatever mechanical issues happen along the way. My bike bag always has at least two inner tubes, a pair of tire levers for getting a tire off the wheel rim, a patch kit, a bike mounted pump for refilling tires, a “boot” for those moments when a tire is slashed so badly that the inner tube pokes through as soon as you start to put air into it (YES, this HAS happened to me!), a small screw driver, and a set of allen wrenches. I really need to carry a chain tool and a spoke wrench and learn how to use them, but for now I’ll be stuck on the side of the road if anything catastrophic happens to these parts of my bike.
Let’s Get Personal
For personal comfort, I always carry a few tissues, a wet wipe or two, some rewetting drops for my contact lenses, and a few pocket-sized tubes of chamois lubricating cream. Nothing creates misery on a long ride faster than sticking to the inside of your shorts. Imagine the blisters which occur when breaking in a new pair of shoes, now picture that on your nether regions. Chamois cream keeps this from happening. Enough said.
A Day and Night of Drinking
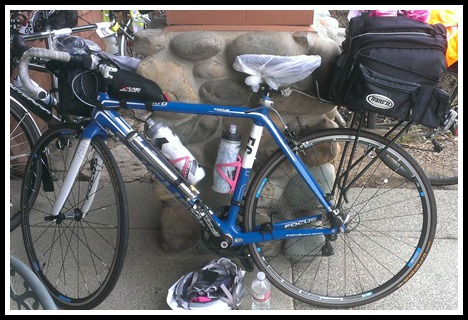
Hydration is critical to success on a long ride. On MOST rides, there are places to stop and refill water with some regularity. I typically carry two standard sized water bottles, the insulated ones. At the start of the ride, both are filled. Whenever I get to a place where I can top off, I do. Never pass up an opportunity to refill a water bottle or to pee in real porcelain! I also carry electrolytes in capsule form, and a little bag of pink salt rocks which is my preferred way to keep enough sodium in my body. On long rides in remote areas when I’m riding without support, I also use a camelback for extra fluid. I hate carrying stuff on my back when I’m riding because it throws off my balance on the bike AND keeps the sweat on my back from drying out. But, it is worth the discomfort if there is risk of running out of water 50 miles before the next town!
Care and Feeding of One Female Cyclist
Food is a whole production unto itself. You all know I’m a food snob, and the number of cyclists who happily chomp down on Gu-like products then complain about digestive problems is fairly astonishing. I’m managed to choke down one packet of engineered glucose with flavoring, and vowed that this would be emergency calories ONLY. Instead, I’ve taken some lessons from “The Feedbag” cookbook and make most of my own ride food. This means I start thinking about food weeks before a big ride.
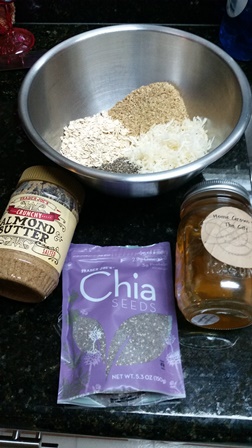 Typical ride food for me includes chicken thighs cut into bite-sized pieces, rolled in almond meal and Parmesan cheese, and baked until crispy. Roasted yams or potatoes. A bag of almonds. I also make homemade rice bars with sweet and savory fillings like scrambled eggs or ground turkey or fresh raspberries with a little sugar. My almond butter/honey/oat/coconut bars provide a good ratio of fat, carbs, and protein. I make a fruit and nut bread which is sliced and individually wrapped, easy to eat one-handed while pedaling. The list goes on, and is limited only by my ability to keep perishable foods cool enough to avoid poisoning myself and my creativity while trying to pull all this stuff together. I typically have a banana or an apple, a bag of mixed nuts, and a few commercial bars for “just in case”.
It gets hard to eat real food at 2am, but your body doesn’t stop requiring fuel even though it is not really time to eat. I do carry protein power and instant coffee for those times when I need calories and just can’t make myself eat solid foods. Since my body doesn’t do whey or soy very happily, the protein I use is pea/rice/hemp with extra branched chain amino acids. It tastes nasty, so I do half strength in the chocolate flavor and add a packet of Starbucks instant French roast. The coffee flavor helps, and the caffeine can literally be a life-saver in the middle of the night!
Nowhere to Stop for Directions…
Ah, yes, I almost forgot navigation equipment. For short rides, there are cell phone apps which can give you turn-by-turn directions, track your progress, and feed your stats to your choice of social media. These are only good for as long as your cell phone battery holds out, which is nowhere near long enough for a ride of 200 miles of more. Even the stand-alone GPS units present power management challenges, and Garmin seems to be of the belief that nobody EVER rides more than 100 miles at a time! I use a now obsolete Garmin 500. The internal battery is good for about 15 hours, and I carry a back-up power pack to keep it going. I’ve found that everything works better if I give the unit “sips” of power throughout the day rather than waiting for that “low power” light to come on. Since this unit can be finicky about receiving too much data and will shut itself off it gets overwhelmed, I also have an old fashioned wired Cateye bike computer attached to my stem. While it won’t let me upload all my statistics to Strava or brag about my accomplishments on Facebook while presenting evidence of such, it WILL keep track of how many miles I’ve travelled since the last turn which allows me to follow a route with the low tech paper route sheet and math method. My general rule of thumb is NEVER trust the Garmin over the route sheet and Cateye. If there is dispute, the paper always wins. I have a neat little strap of Velcro with a clip on it which holds that trusty route sheet, wrapped in plastic if I’m expecting weather, right where I can see it.
Summing it All Up
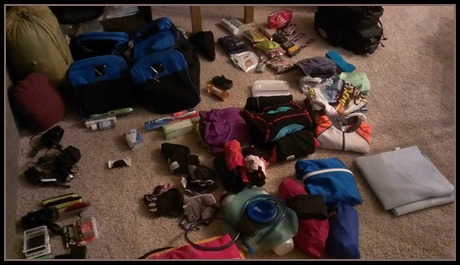
 As you can imagine, this is a TON of stuff to carry on one bicycle with limited real estate. For short local rides, I use a mid-sized handlebar bag and my shirt pockets for food, a mid-sized under the saddle bag for tools and tubes and an extra shirt, a small bag on my top tube for lip balm and snacks I want while pedaling. For multi-day rides, the rear rack goes onto the bike with the trunk bag which is big enough to fit extra food, more tools, a jacket, and more incidentals. I also pull out the biggest handlebar bag my 5’5” girl-sized frame will allow for still more food and stuff.
The preparation for a ride up to 200 miles really begins a day or two before and is fairly basic. For rides of 250-400 miles, preparation begins about a month before and comes to a screaming frenzy for a day or two at the end. Rides longer than 400 miles are an epic expedition requiring months of planning, food preparation with liberal use of the freezer, GPS wrangling, and ideally a buddy to provide some support and extra food along the way.
Two days before leaving for a 600k which involves driving 150 miles followed by a 6 hour train ride before I even get onto the bike, I’m here writing a blog post about what I need to do rather than getting it done. Yikes! Time to get packing…